Plumber’s putty is a small but essential product in the arsenal of any do-it-yourselfer. No doubt, you’ve seen it at hardware stores or in your friendly plumber’s toolbox.
If you need to stop or prevent leaks around your faucet, sink, or tub drains, this malleable, clay-like compound prevents water migration between two rigid surfaces, creating watertight seals in nonpressurized areas.
What is Plumber’s Putty Used For?
Designed for plumbing applications, plumber’s putty is easy to wipe away after installation and will not be visible outside the plumbing fixture. Oatey Plumber's Putty will last two years from the manufacture date if the lid is sealed properly.
Plumber’s putty is used for:
- Sink basket strainers
- Faucet bases
- Pop-up drains
- Shower drains
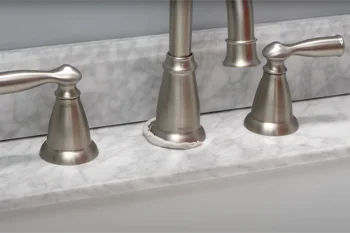
Choosing the Best Plumber’s Putty
Recommended for setting fixtures, faucets, frames and strainers, Oatey® Plumber’s Putty remains flexible and easy to work with. It has no cure/dry time and does not stick to hands, thus making your project quick, easy, and mess-free.
Because plumber’s putty is oil-based, it can stain porous materials, such as granite, marble, quartz and sandstone. For application on these surfaces, use Oatey® Stain-Free Plumber’s Putty, as this product is oil-free and will not stain the porous material.

How to Use Plumber's Putty
Plumber’s putty is designed to remain flexible and prevent water from leaking through fixtures into cabinetry or subsurfaces. It is shaped by hand before it is applied to the plumbing part.
Follow these basic steps to apply plumber’s putty:
- Use the right putty: Always verify surface type and fixture material to determine if it is compatible with plumber’s putty. Then assess whether stain-free or regular plumber’s putty is right for your application.
- Clean the surface: Before using plumber’s putty, ensure all surfaces are dry and free from hardened putty, dirt, wax, oil, and grease. Remove debris by wiping it with a cloth, scraper, or wire brush as needed, and dry the surface.
- Roll the putty: Knead the putty in your hands until soft and pliable. Then form it into a rope or a long, cord-like shape (roughly ½-inch thick).

- Apply the rope: Form a complete circle with the putty around the underside of the flange of the item you are installing, making sure to blend the two ends where they meet. If the rope is too short, start over and roll a longer one.
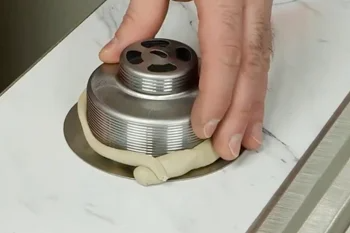
- Press and install: Install your product, e.g., bath waste, shower drain, pop-up, or basket strainer, according to the manufacturer's instructions. As you secure your product, the excess putty will ooze out from under the flange and around the fixture, ensuring sufficient putty has been applied and a continuous seal has been made. Don’t overtighten fixtures; the goal is a snug, sealed fit, not crushed putty.
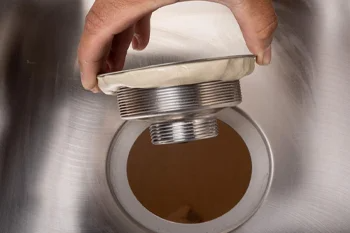
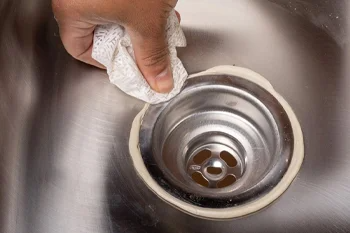
- Wipe excess: After the item is secured, wipe away excess putty with a putty knife, wiping it clean. If the excess putty is clean and debris-free, it can be put back in the container.
- For colder applications: If putty is used in colder applications, wait 10 minutes after the initial installation and confirm the product does not need an extra turn to ensure it is properly secure.
- Seal and store putty correctly: If the excess putty is clean and debris-free, it can be put back in the container. Be sure to seal the lid completely so the putty stays clean and isn't exposed to air. If exposed to air for an extended period, putty can dry out and cannot be reused.
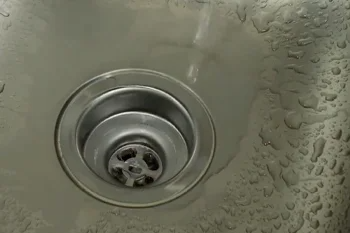
Note: The sink, faucet or shower can be used immediately after the part has been put into place. Run the water after installation to check for any leaks. If a leak is present, the drain will have to be removed from the fixture before reapplying putty. Once reapplied, the drain can be reinstalled.
Reapply fresh putty if a fixture is disassembled or adjusted. This method provides a reliable seal that resists leaks in non-pressurized applications.
When Not to Use Plumber's Putty
Plumber’s putty is a versatile sealing material, but there are key situations where it is not the right choice:
- Pressurized connections: Plumber’s putty is not suitable for pressurized environments. It cannot hold up where water pressure is present, such as in gasketed fittings or on the threads of pipes. Instead, use thread sealant or Teflon tape for these applications.
- Plastic components: Avoid using plumber's putty on plastic materials, particularly acrylic and ABS types, as it can affect the integrity of the material and lead to product failure. Always check compatibility before use, or consider using Oatey® Stain-Free Plumber’s Putty.
- Porous materials: Regular plumber's putty should not be used on porous surfaces like granite, marble, or other natural stones. As noted previously, it can lead to staining.
- Toilets and heavy fixtures: Historically, plumber’s putty was used to seal a leaky toilet or toilet bowl to a finished floor; however, we do not recommend it for these types of applications because the floor supports a toilet and is not waterproof. Cleaners and urine can also compromise the integrity of the putty if they come in contact with one another on the bathroom floor. Unlike caulk, the conventional choice to help seal the toilet bowl to the floor, plumber’s putty has no adhesion value. The putty will dry out when exposed to air and no longer fill the voids between the floor and bowl. Plumber’s putty may also stain finished floor surfaces.
- Sealing windows or doors: Plumber’s putty lacks any insulating qualities, so it is not the right choice for sealing windows or doors.
- Acrylic surfaces: Both stain-free and regular plumber’s putty can affect the finish of acrylic surfaces. It should not be used when installing the drain on an acrylic tub and/or shower unit. Plumber’s putty could have an adverse effect on the acrylic finish, similar to its effect on ABS (Acrylonitrile Butadiene Styrene) plastic materials. Use 100% silicone for these applications.
Plumber’s Putty vs. Silicone
While plumber’s putty is a trusted sealant for certain plumbing installations, it’s important to understand when alternatives like silicone or caulk may be more appropriate. Each product has its strengths. This chart provides a comparison to help you choose the right one for your project:
| Feature | Plumber’s Putty | Silicone Sealant / Siliconized Caulk |
|---|---|---|
| Type | Pliable, nonadhesive sealing compound | Adhesive-based sealant |
| Best Uses | Strainers, faucets, drains, tub waste and overflow fittings | Sinks, tubs, showers, windows, weather-exposed joints |
| Ease of Use | Very easy – beginner-friendly; no tools required | Requires precision and tools like a caulking gun |
| Flexibility | Soft, moldable, repositionable | Not repositionable once cured |
| Cure Time | Does not cure; remains pliable if sealed from air | Cures in hours to 1 day; hardens over time |
| Removability | Easy to remove before exposure to air | Difficult to remove after curing |
| Durability | Long-lasting if kept airtight | Highly durable and UV-resistant |
| Water Resistance | Water-resistant, not waterproof | Fully waterproof; ideal for wet areas |
| Reusability | Can be reshaped and reused before drying | Not reusable once cured |
Choosing the right product depends on your application, surface material, and whether flexibility or permanence is more important. To learn how to choose the right caulk or sealant for your next plumbing project, check out this guide here.
Common Questions About Plumber’s Putty
Does plumber’s putty harden?
No, plumber’s putty does not harden. It stays soft to maintain a watertight seal, and can be removed or adjusted if needed.
Can you use plumber’s putty on plastic?
Use with caution. Standard plumber’s putty, including Oatey® Stain-Free Plumber’s Putty, is only approved for use on PVC and should not be used on other types of plastic materials such as ABS or acrylic, as the formula can cause degradation. If you're working with non-PVC plastic components, use a sealant that is specifically formulated and approved for compatibility with that material.
How long does plumber’s putty take to dry?
It doesn’t need to dry or cure. It’s ready for water exposure immediately after installation.
Is plumber’s putty waterproof?
It creates a waterproof seal between rigid surfaces. However, while water-resistant, it is not waterproof or weatherproof.
How do you remove plumber’s putty?
Scrape off gently with a plastic putty knife or rag. If hardened slightly, use a soft cloth and mild cleaner.
Where can you apply plumber’s putty?
Use it on under-sink flanges, faucet bases, and other non-pressurized fixtures where water must be sealed.